Kia Optima DL3: Crash Pad / Crash Pad Center Panel
Components and components location
| Component Location |
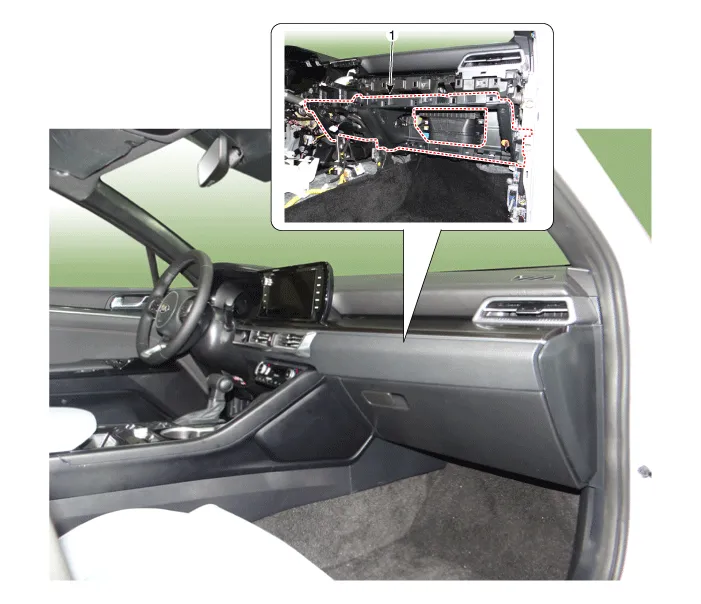
| 1. Crash pad center panel |
Repair procedures
| Replacement |
|

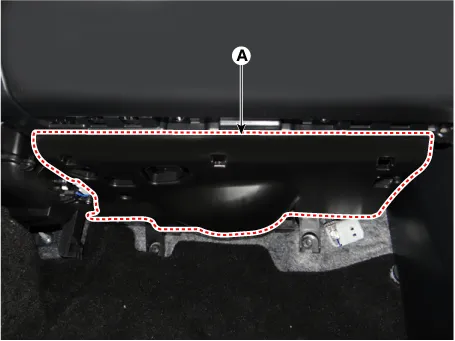
| 1. |
Using a remover and remove the crash pad under cover (A).
|
| 2. |
Remove the floor console assembly. (Refer to Floor Console - "Floor Console Assembly") |
| 3. |
Remove the cowl side trim. (Refer to Interior Trim - "Cowl Side Trim") |
| 4. |
Remove the glove box. (Refer to Crash Pad - "Glove Box") |
| 5. |
Remove the crash pad lower panel. (Refer to Crash Pad - "Crash Pad Lower Panel") |
| 6. |
Remove the crash pad garnish. (Refer to Crash Pad - "Crash Pad Garnish") |
| 7. |
Remove the heater & A/C control unit . (Refer to Heating,Ventilation, Air Conditioning - "Heater & A/C Control Unit (MANUAL)") (Refer to Heating,Ventilation, Air Conditioning - "Heater & A/C Control Unit (DATC)") (Refer to Heating,Ventilation, Air Conditioning - "Heater Control Unit") |
| 8. |
After loosening the mounting screws, remove the center air vent garnish (A).
|
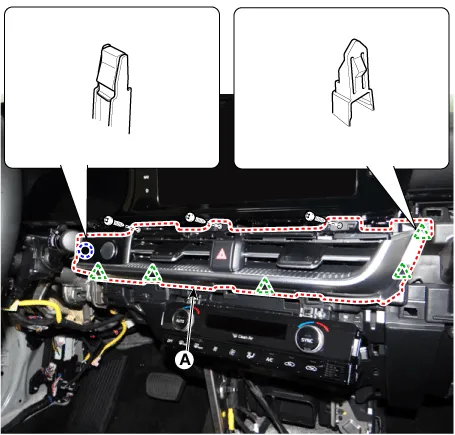
| 9. |
Disconnect the start swich connector (A) hazard swich connector (B).
|

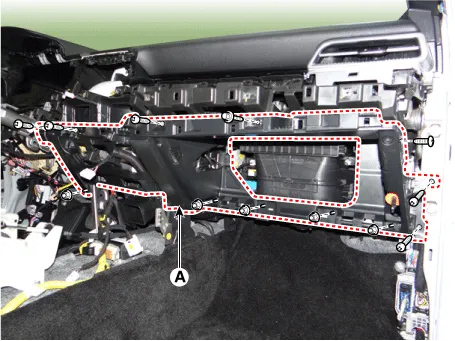
| 10. |
After loosening the mounting bolt and nuts, screws, remove the crash pad center panel (A).
|
| 11. |
To install, reverse the removal procedure.
|

Repair procedures Replacement • When removing with a flat-tip screwdriver or remover, wrap protective tape around the tools to prevent damage to components.
Components and components location Component Location 1. Main crash pad assembly Repair procedures Replacement • When removing with a flat-tip screwdriver or remover, wrap protective tape around the tools to prevent damage to components.
Other information:
Kia Optima DL3 2019-2026 Service and Repair Manual: Rear Glass Defogger Printed Heater
Repair procedures Inspection • Wrap tin foil around the end of the voltmeter test lead to prevent damaging the heater line. Apply pressure on the tin foil with hand and move the tin foil along the grid line to check for open circ
Kia Optima DL3 2019-2026 Service and Repair Manual: Receiver-Drier
Repair procedures Replacement 1. Remove the condenser. 2. Remove the cap (A) on the bottom of the condenser with a L wrench. Tightening torque : 9.81 - 14.71 N.
Categories
- Manuals Home
- Kia Optima Owners Manual
- Kia Optima Service Manual
- Timing Chain
- Floor Console Assembly
- Restraint
- New on site
- Most important about car
