Kia Optima DL3: Front Door / Front Door Side Weatherstrip
Repair procedures
| Replacement |
| [Front door side weatherstrip] |
| 1. |
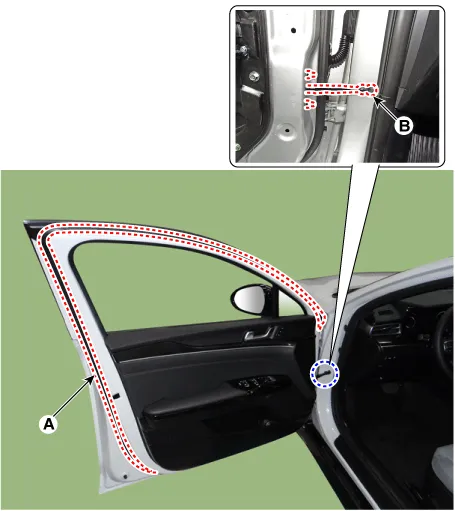
Loosen the front door checker (B) mounting bolt.
|
| 2. |
Detach the clips, then remove the front door side weatherstrip (A).
|
| 3. |
To install, reverse the removal procedure.
|

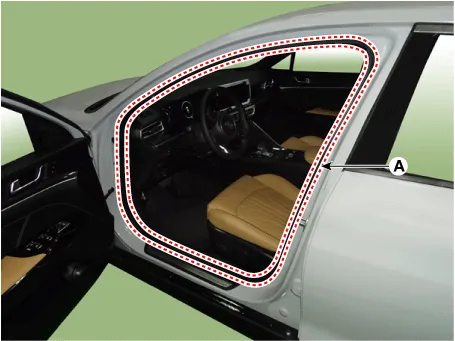
| [Front door body side weatherstrip] |
| 1. |
Detach the clips, then remove the front door body side weatherstrip (A).
|
| 2. |
To install, reverse the removal procedure.
|
Repair procedures Replacement 1. Remove the front door trim. (Refer to Front Door - "Front Door Trim") 2.
Components and components location Component Location 1. Front door latch Repair procedures Replacement • When removing with a flat-tip screwdriver or remover, wrap protective tape around the tools to prevent damage to components.
Other information:
Kia Optima DL3 2019-2026 Service and Repair Manual: License Lamps
Repair procedures Removal 1. Disconnect the negative battery terminal. 2. Remove the lcense lamp (A) by pressing the hook. 3. Disconnect the lcense lamp connector (A).
Kia Optima DL3 2019-2026 Service and Repair Manual: Refrigerant Line
Components and components location Components Location 1. Suction & Liquid tube assembly 2. Discharge hose Repair procedures Replacement 1. If the compressor is marginally operable, run the engine at idle speed, and let the air conditioning work for a few minute
Categories
- Manuals Home
- Kia Optima Owners Manual
- Kia Optima Service Manual
- Steering System
- Headlamps
- Body (Interior and Exterior)
- New on site
- Most important about car
