Kia Optima DL3: Light bulbs / Tail lamp bulb replacement

1. Open the trunk lid.
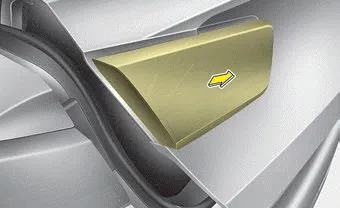
2. Loosen the retaining screw of the trunk lid cover and then remove the cover.
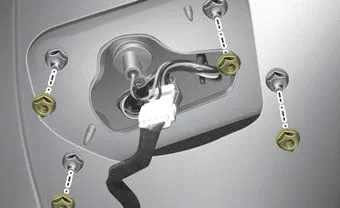
3. Remove the nuts from the vehicle.
4. Disconnect the rear combination lamp (inside) connector.
5. Remove the rear combination lamp (inside) assembly from the body of the vehicle.
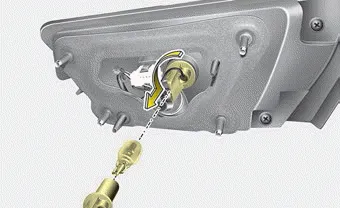
6. Remove the socket from the assembly by turning the socket counterclockwise until the tabs on the socket align with the slots on the assembly.
7. Remove the bulb from bulb-socket by pulling it out.
8. Insert a new bulb into the bulbsocket.
9. Install the socket in the assembly by aligning the tabs on the socket with the slots in the assembly. Push the socket into the assembly and turn the socket clockwise.
10. Install the rear combination lamp (inside) assembly to the body of the vehicle.
11. Install the trunk lid cover.
1. Open the trunk lid. 2. Loosen the retaining screw of the trunk lid cover and then remove the cover. 3. Remove the nuts from the vehicle.
1. Open the trunk lid. 2. Loosen the retaining screw of the trunk lid cover and then remove the cover. 3. Remove the socket from the assembly by turning the socket counterclockwise until the tabs on the socket align with the slots on the assembly.
Other information:
Kia Optima DL3 2019-2026 Service and Repair Manual: Panorama Sunroof Switch
Schematic diagrams Connector and Terminal Function Repair procedures Inspection 1. Remove the overhead console lamp. (Refer to Lighting System - "Overhead Console Lamp") 2. Check for continuity between the terminals in each switch position according to the table
Kia Optima DL3 2019-2026 Service and Repair Manual: Wiper Motor
Schematic diagrams Connector and Terminal Function Pin Function 1 Ground (-) 2 Parking 3 Power (+) 4 Low 5 High Repair procedures Remova
Categories
- Manuals Home
- Kia Optima Owners Manual
- Kia Optima Service Manual
- Timing Chain
- Lift And Support Points
- Body Electrical System
- New on site
- Most important about car
