
Kia Optima DL3: Wiper/Washer / Wiper Motor
Schematic diagrams
| Connector and Terminal Function |

|
Pin |
Function |
|
1 |
Ground (-) |
|
2 |
Parking |
|
3 |
Power (+) |
|
4 |
Low |
|
5 |
High |
Repair procedures
| Removal |
| 1. |
Remove the cowl top cover. (Refer to Body - "Cowl Top Cover") |
| 2. |
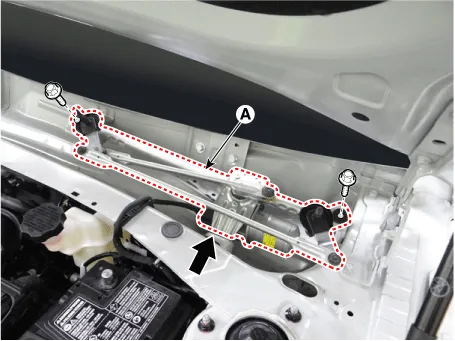
Remove the wiper motor & linkage assembly (A) after loosening the mounting bolts.
|
| 3. |
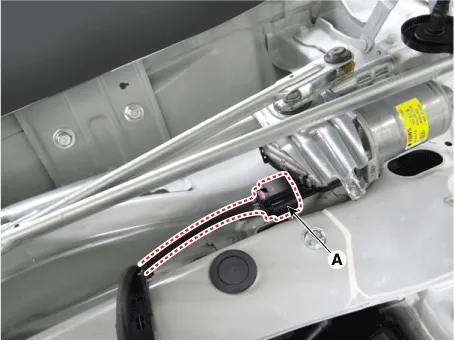
Disconnect the wiper motor connector (A).
|
| Installation |
| 1. |
Install in the reverse order of the removal. |
| Inspection |
| Diagnosis with KDS |
| 1. |
In the body electrical system, failure can be quickly diagnosed by using the vehicle diagnostic system (KDS). The diagnostic system(KDS) provides the following information.
|
| 2. |
Select the 'Car model' and the 'Integrated body control unit (IBU)' to be checked in order to check the vehicle with the tester. |
| 3. |
Select the 'Current Data' menu to search the current state of the input/output data. |
Repair procedures Removal 1. If necessary, remove the blade by pushing it in the direction arrow after opening the hook (A).
Repair procedures Replacement 1. If wiper switch needs to be replaced, replace the multifunction switch assembly. (Refer to Body Electrical System - "Multifunction Switch")
Other information:
Kia Optima DL3 2019-2026 Service and Repair Manual: Wiper Arm
Repair procedures Removal 1. If necessary, remove the blade by pushing it in the direction arrow after opening the hook (A). • Move the windshield glass wiper blades to the servic
Kia Optima DL3 2019-2026 Service and Repair Manual: Cluster Ionizer
Components and components location Components Location 1. Condenser Description and operation Description The cluster ionizer makes disinfection and decomposition of bad smell from the air-conditioner or inflow air.
Categories
- Manuals Home
- Kia Optima Owners Manual
- Kia Optima Service Manual
- Motor Driven Power Steering
- Suspension System
- Body Electrical System
- New on site
- Most important about car
