Kia Optima DL3: Body (Interior and Exterior) / Floor Carpet
Repair procedures
| Replacement |
|

| 1. |
Remove the front seat assembly. (Refer to Front Seat - "Front Seat Assembly") |
| 2. |
Remove the rear seat cushion assembly. (Refer to Rear Seat - "Rear Seat Assembly") |
| 3. |
Remove the front door body side weatherstrip. |
| 4. |
Remove the rear door body side weatherstrip. |
| 5. |
Remove the front door scuff trim. (Refer to Interior Trim - "Door Scuff Trim") |
| 6. |
Remove the rear door scuff trim. (Refer to Interior Trim - "Door Scuff Trim") |
| 7. |
Remove the cowl side trim. (Refer to Interior Trim - "Cowl Side Trim") |
| 8. |
Remove the center pillar lower trim. (Refer to Interior Trim - "Center Pillar Trim") |
| 9. |
Remove the floor console assembly. (Refer to Floor Console - "Floor Console Assembly") |
| 10. |
Remove the accelerator pedal. G 2.0 NU MPI (Refer to Engine Control/Fuel System - "Accelerator Pedal") G 2.5 GDI THETA II (Refer to Engine Control/Fuel System - "Accelerator Pedal") |
| 11. |
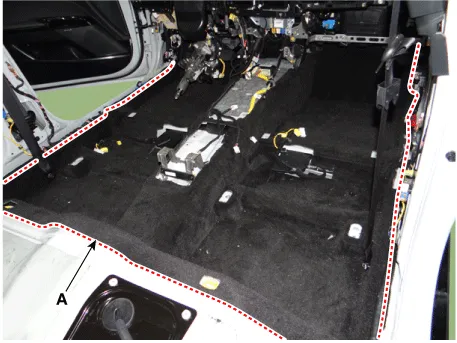
Remove the floor carpet assembly (A).
|
| 12. |
To install, reverse the removal procedure.
|

Components and components location Component Location 1. Quarter fixed glass Repair procedures Removal • When removing with a flat-tip screwdriver or remover, wrap protective tape around the tools to prevent damage to components.
Components and components location Components 1. Front bumper assembly 2. Front bumper beam assembly 3. Front bumper side bracket [LH] 4.
Other information:
Kia Optima DL3 2019-2026 Service and Repair Manual: Rheostat
Schematic diagrams Connector and Terminal Function Repair procedures Removal 1. Disconnect the negative battery terminal. 2. Remove the crash pad lower panel. (Refer to Body - "Crash Pad Lower Panel") 3.
Kia Optima DL3 2019-2026 Service and Repair Manual: Washer Switch
R
Categories
- Manuals Home
- Kia Optima Owners Manual
- Kia Optima Service Manual
- Front Axle Assembly
- Floor Console Assembly
- Engine Control Module (ECM)
- New on site
- Most important about car
