
Kia Optima DL3: Fuel Filler Door / Fuel Filler Door Unlock Actuator
Repair procedures
| Removal |
| 1. |
Disconnect the negative battery terminal. |
| 2. |
Remvoe the fuel door housing. (Refer to Body - "Fuel Filler Door") |
| 3. |
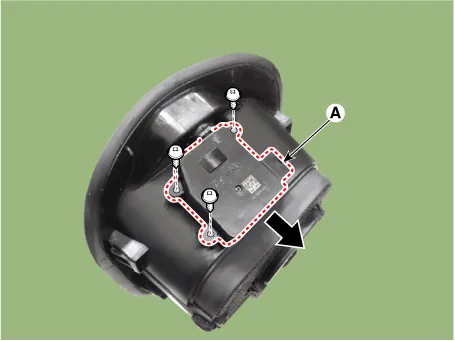
Remove the fuel filler door unlock actuator (A) by loosening the mounting screws.
|
| Installation |
| 1. |
Install in the reverse order of removal. |
| Inspection |
| 1. |
Disconnect the negative battery terminal. |
| 2. |
Remove the left luggage side trim. (Refer to Body - "Luggage Side Trim") |
| 3. |
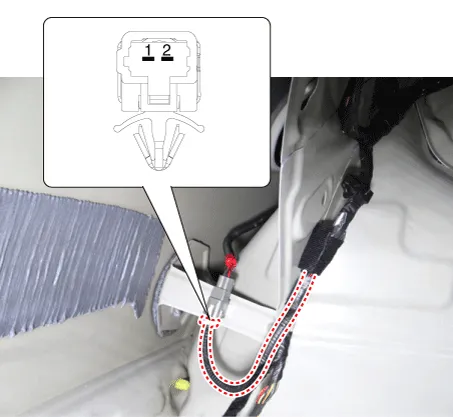
Disconnect the fuel filler door unlock actuator connector. |
| 4. |
Check for continuity between terminals No. 1 and No. 2. If there is no continuity, replace the fuel filler door unlock actuator.
|
Components and components location Components Location 1. Fuel filler door unlock actuator
Schematic diagrams Connector and Terminal Function Repair procedures Removal 1. Disconnect the negative battery terminal.
Other information:
Kia Optima DL3 2019-2026 Service and Repair Manual: Smart Key Unit
Schematic diagrams Connector and Terminal Function Pin Function Connector A Connector B Connector C Connector D 1 - Front washer switch (Output) - Driver outside handle switch (Input)
Kia Optima DL3 2019-2026 Service and Repair Manual: Intake Actuator
Components and components location Components Location 1. Intake actuator Description and operation Description The intake actuator is located at the blower unit. It regulates the intake door by a signal from the control unit.
Categories
- Manuals Home
- Kia Optima Owners Manual
- Kia Optima Service Manual
- Suspension System
- Restraint
- Engine Control / Fuel System
- New on site
- Most important about car
