Kia Optima DL3: What to do in an emergency / If you have a flat tire (with Tire Mobility Kit)
Please read the instructions before using the Tire Mobility Kit.
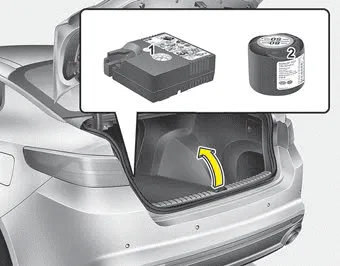
(1) Compressor
(2) Sealant bottle
The Tire Mobility Kit is a temporary fix to the tire and the tire should be inspected by an authorized Kia dealer as soon as possible.
CAUTION - One sealant for one tire
When two or more tires are flat, do not use the Tire Mobility Kit because the canister of sealant only contains enough sealant for one flat tire.
WARNING - Tire wall
Do not use the Tire Mobility Kit to repair large punctures or damage to the tire sidewalls. In these situations, the tire cannot be sealed completely and air will leak from the tire. This can result in tire failure.
WARNING - Speed with temporary fix
Do not exceed a speed of 80 km/h (50 mph) when driving with a tire sealed with the Tire Mobility Kit. While driving, if you experience any unusual vibration, ride disturbance or noise, reduce your speed and drive with caution until you can safely pull off the side of the road.
WARNING - Temporary fix
Have your tire repaired as soon as possible. The tire may lose air pres-sure at any time after inflating with the Tire Mobility Kit.
CAUTION
When repairing a flat tire with the Tire Mobility Kit (TMK), quickly remove the sealant on the tire pressure sensor and wheel. When installing the repaired tire and wheel, tighten the wheel nut to a torque value of 11 ~ 13 kgf·m (24 ~ 28 ft·lb).
WARNING - Tire wall
Do not use the Tire Mobility Kit to repair large punctures or damage to the tire sidewalls. In these situations, the tire cannot be sealed completely and airwill leak from the tire. This can result in tire failure.
- Introduction
- Notes on the safe use of the Tire Mobility Kit
- Components of the Tire Mobility Kit (TMK)
- Using the Tire Mobility Kit
- Checking the tire inflation pressure
- Technical Data
If you have a flat tire, the Low Tire Pressure telltale will come on. Have the flat tire repaired by an authorized Kia dealer as soon as possible or replace the flat tire with the spare tire.
With the Tire Mobility Kit (TMK) you stay mobile even after experiencing a tire puncture. The system compressor and sealing compound effectively seal most punctures in a passenger car tire caused by nails or similar objects and reinflates the tire.
Other information:
Kia Optima DL3 2019-2026 Service and Repair Manual: Rear Combination Lamp
Components and components location Component Location 1. Tail lamp 2. Stop lamp 3. Tail/Stop lamp 4. Back up lamp 5. Turn signal lamp Schematic diagrams Connector and Terminal Function [A Type] Pin Function Center Ou
Kia Optima DL3 2019-2026 Service and Repair Manual: Vanity Lamp
Repair procedures Removal When removing with a flat-tip screwdriver or remover, wrap protective tape around the tools to prevent damage to components. 1.
Categories
- Manuals Home
- Kia Optima Owners Manual
- Kia Optima Service Manual
- Motor Driven Power Steering
- Automatic Transaxle System
- Floor Console Assembly
- New on site
- Most important about car
