Kia Optima DL3: Interior Trim / Cowl Side Trim
Components and components location
| Component Location |
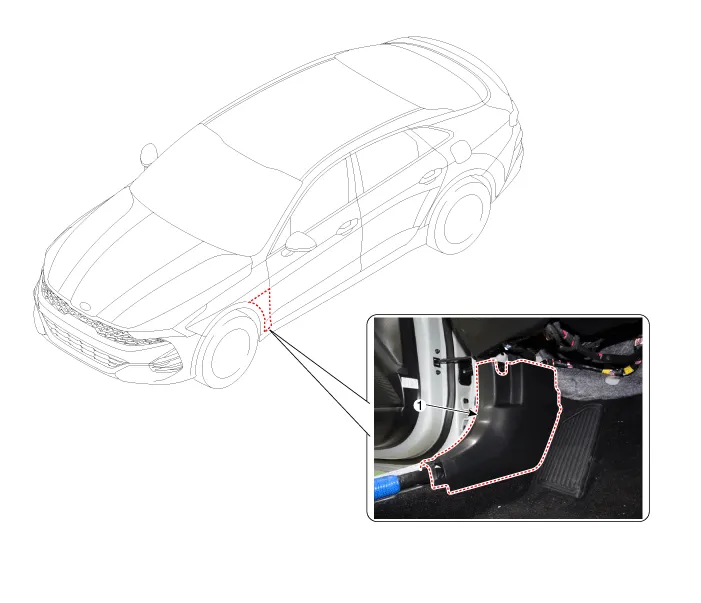
| 1. Cowl side trim |
Repair procedures
| Replacement |
Put on gloves to prevent hand injuries. |

|

| 1. |
Remove the front door scuff trim. (Refer to Interior Trim - "Door Scuff Trim") |
| 2. |
Remove the hood latch release handle. (Refer to Hood - "Hood Latch Release Handle") |
| 3. |
Carefully remove the front door body side weatherstrip. |
| 4. |
Using a screwdriver or remover, remove the cowl side trim (A).
|

| 5. |
To install, reverse the removal procedure.
|

Repair procedures Replacement Put on gloves to prevent hand injuries.
Components and components location Component Location 1. Front pillar trim Repair procedures Replacement • Put on gloves to prevent hand injuries.
Other information:
Kia Optima DL3 2019-2026 Service and Repair Manual: Multifunction Switch
Specifications Specifications Items Specifications Rated voltage Front fog lamp switch 5 V Lighting Auto lighting Dimmer & Passing Turn signal lamp Wiper Was
Kia Optima DL3 2019-2026 Service and Repair Manual: Blower Resistor
Repair procedures Inspection 1. Measure the resistance between the terminals. 2. measured resistance is not within specification, the blower resistor must be replaced. (After removing the resistor) (1) Pin No 1.
Categories
- Manuals Home
- Kia Optima Owners Manual
- Kia Optima Service Manual
- Cooling System
- Steering System
- Engine Control / Fuel System
- New on site
- Most important about car
