Kia Optima DL3: Lighting System / Fog Lamp
Repair procedures
| Removal |
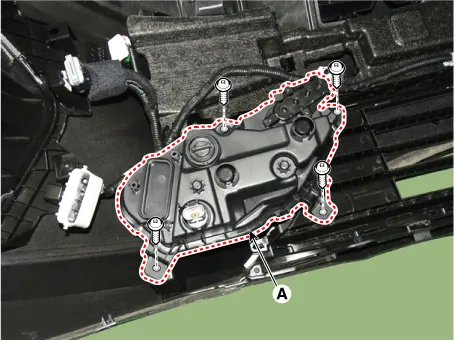
Front Fog Lamp
| 1. |
Disconnect the negative battery terminal. |
| 2. |
Remove the front bumper assembly. (Refer to Body - "Front Bumper Assembly") |
| 3. |
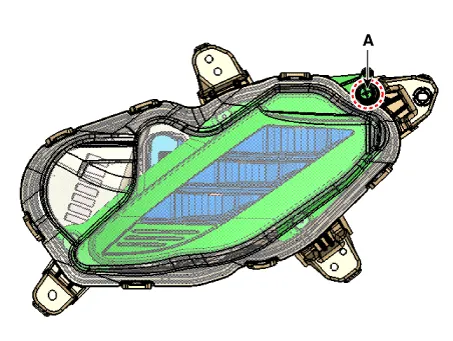
Remove the front fog lamp assembly (A) by loosening the mounting screws.
|
| Installation |
| 1. |
Install in the reverse order of removal.
|

| Adjustment |
Front Fog Lamp Aiming Procedures
|
| If beam-setting equipment is not available, proceed as follows : |
| 1. |
Inflate the tires to the specified pressure and remove any loads from the vehicle except the driver, spare tire, and tools. |
| 2. |
The vehicle should be placed on a flat floor. |
| 3. |
Draw vertical lines (passing through respective fog lamp centers) and a horizontal line (passing through center of fog lamp) on the screen. |
| 4. |
With the fog lamps and battery in normal condition, aim the fog lamps so the brightest portion falls on the horizontal and vertical lines. A : Fog vertical
|

Fog Lamp Aiming Point

[General type]
|
Vehicle condition |
H |
L |
Note |
|
Empty |
338 (13.3070) |
1052 (41.4173) |
ALL DIM in mm (in.) |
|
1 person on board |
333 (13.1102) |
[GT-Line type]
|
Vehicle condition |
H |
L |
Note |
|
Empty |
377 (14.8425) |
1527 (60.1181) |
ALL DIM in mm (in.) |
|
1 person on board |
372 (14.6456) |
| 1. |
Turn the front fog lamp on without the driver aboard. |
| 2. |
The cut-off line should be projected in the allowable range (shaded region).
|
Specifications Specification Item Tyep Watt (W) Front Headlamp A Type High beam LED - Low beam LED - Position/DRL LED - B Type High beam LED - Low beam LED - Low assist LED - Position/DRL LED - Turn signal lamp LED - Fog lamp LED - Turn signal lamp (Front air duct) PY21W 21 Turn signal lamp (Outside mirror side) LED - Rear Rear combination lamp A Type Tail/Stop lamp 21/5W 21/5 Tail lamp W5W 5 Turn signal lamp PY21W 21 Back up lamp W16W 16 B Type Tail/Stop lamp LED - Tail lamp LED - Turn signal lamp PY21W 21 Back up lamp W16W 16 High mounted stop lamp LED - License plate lamp W5W 5 Interior Overhead console lamp LED - Room lamp LED - Personal lamp LED - Vanity lamp W5W 5 Trunk room lamp FESTOON 5 Components and components location Component Location 1.
Schematic diagrams Connector and Terminal Function Repair procedures Removal 1. Disconnect the negative battery terminal.
Other information:
Kia Optima DL3 2019-2026 Service and Repair Manual: Power Door Mirror Switch
Schematic diagrams Connector and Terminal Function Pin Function 1 B-CAN (Low) 2 B-CAN (High) 3 Ground (Assist safety) 4 Assist safety 5 LIN (For IMS)
Kia Optima DL3 2019-2026 Service and Repair Manual: Climate Control Air Filter
Description and operation Description The climate control air filter is located in the blower unit. It eliminates foreign materials and odor. The particle filter performs a role as an odor filter as well as a conventional dust filter to ensure comfortable interior environment.
Categories
- Manuals Home
- Kia Optima Owners Manual
- Kia Optima Service Manual
- Motor Driven Power Steering
- Body Electrical System
- Engine Control / Fuel System
- New on site
- Most important about car
