Kia Optima DL3: Features of your vehicle / Smart trunk
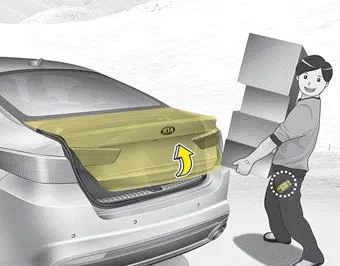
On a vehicle equipped with a smart key, the trunk lock is released with no-touch activation using the Smart Trunk system.
How to use the Smart Trunk
The trunk can be opened with notouch activation if the following conditions are met:
- It has been over 15 seconds since all doors closed and locked
- The smart key is positioned in the detecting area for more than 3 seconds.
✽ NOTICE
- The Smart Trunk does not operate when:
- The smart key is detected within 15 seconds after the doors are closed and locked, and is continuously detected.
- The smart key is detected within 15 seconds after the doors are closed and locked, and 1.5 m (60 inches) from the front door handles (for vehicles equipped with Welcome Light).
- A door is not locked or closed.
- The smart key is in the vehicle.
1. Setting
To activate the Smart Trunk, go to User Settings Mode and select Smart Trunk on the LCD display.
❈ For more details, refer to “LCD Display” in this chapter.

2. Detect and Alert
If you are positioned in the detecting area (50 ~100 cm (20 ~ 40 inches) behind the vehicle) carrying a smart key, the hazard warning lights will blink and the chime will sound for about 3 seconds to alert you the smart key has been detected and the trunk will open.
✽ NOTICE
Do not approach the detecting area if you do not want the trunk to open. If you have unintentionally entered the detecting area and the hazard warning lights and chime starts to operate, leave the detecting area with the smart key. The trunk will stay closed.
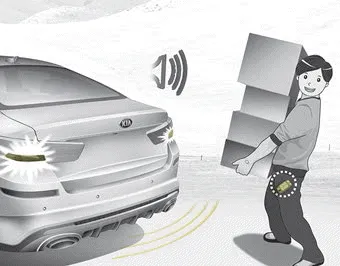
3. Automatic opening
The hazard warning lights will blink and the chime will sound 2 times and then the trunk lock will be released.
Make certain that you close the trunk before driving your vehicle.
Make sure there are no people or objects around the trunk before opening or closing the trunk.
Make sure to deactivate the Smart trunk function when washing your vehicle.
Otherwise, the trunk may open inadvertently.
WARNING
Make sure objects in the rear cargo area do not come out when opening the trunk as this could cause serious injury.
✽ NOTICE
The key should be kept out of reach of children. Children may inadvertently open the Smart Trunk while playing around the rear area of the vehicle.
How to deactivate the Smart Trunk function using the smart key

1. Door lock
2. Door unlock
3. Trunk open
4. Panic
If you press any button of the smart key during the Detect and Alert stage, the Smart Trunk function will be deactivated.
Make sure to be aware of how to deactivate the Smart Trunk function for emergency situations.
✽ NOTICE
- If you press the door unlock button (2), the Smart Trunk function will be deactivated temporarily. But, if you do not open any door for 30 seconds, the smart trunk function will be activated again.
- If you press the trunk open button (3) for more than 1 second, the trunk opens.
- If you press the door lock button (1) or trunk open button (3) when the Smart Trunk function is not in the Detect and Alert stage, the smart trunk function will not be deactivated.
- If you have deactivated the Smart Trunk function by pressing the smart key button and opened a door, the smart trunk function can be activated again by closing and locking all doors.
Detecting area

- The Smart Trunk operates a welcome alert if the smart key is detected within 50 ~ 100 cm (20 ~ 40 inches) from the trunk.
- The alert stops if the smart key is positioned outside the detecting area during the Detect and Alert stage.
✽ NOTICE
- The Smart Trunk function will not work if any of the following occurs:
- The smart key is close to a radio transmitter such as a radio station or an airport which can interfere with normal operation of the transmitter.
- The smart key is near a mobile two way radio system or a cellular phone.
- Another vehicle's smart key is being operated close to your vehicle. - The detecting range may decrease or increase when :
- One side of the vehicle is raised to replace a tire or to inspect the vehicle.
- The vehicle is parked on a slope or unpaved road, etc.
Your vehicle is equipped with an emergency trunk release lever located inside the trunk. If someone is inadvertently locked in the trunk, moving the handle in the direction of the arrow will release the trunk latch mechanism and open the trunk.
(1) Driver’s door power window switch (2) Front passenger’s door power window switch (3) Rear door (left) power window switch (4) Rear door (right) power window switch (5) Window opening and closing (6) Automatic power window up/down (Driver's and Passenger's window) (7) Power window lock button In cold and wet climates, power windows may not work properly due to freezing conditions.
Other information:
Kia Optima DL3 2019-2026 Service and Repair Manual: In-car Sensor
Description and operation Description The In-car air temperature sensor is built in the heater & A/C control unit. The sensor contains a thermistor which measures the temperature of the inside. The signal decided by the resistance value which changes in accordance with perceived inside temperature, is delivered to heater co
Kia Optima DL3 2019-2026 Service and Repair Manual: Auto Defoging Actuator
Components and components location Components Location 1. Auto logging actuator Description and operation Description The auto defogging sensor is installed on front window glass. The sensor judges and sends signal if moisture occurs to blow out wind for defogging.
Categories
- Manuals Home
- Kia Optima Owners Manual
- Kia Optima Service Manual
- Steering System
- Rear Brake Disc
- Headlamps
- New on site
- Most important about car
